Cyclocross bike maintenance – cantilever brakes
Adjust your cantilever brakes.

This article originally appeared in our October/November 2012 issue.
Most cyclo-cross bikes are equipped with cantilever brakes to provide maximum mud clearance and optimal stopping power on changing terrain and in a variety of weather conditions. You can adjust your cantilever brakes by following these three easy steps.
Step 1: Preparation
Disconnect the brake cable from the brake arm. Using either a 4-mm or 5-mm Allen key, remove the brake-pivot mounting bolts and slide off the brake arms. Clean the brake arms, springs and all the hardware thoroughly. In addition, clean the brake posts on the frame and fork. Use an emery cloth to remove any rust from the brake posts; ensure the posts are fastened tightly to the frame. Apply a thin layer of grease to the brake posts. If the pads don’t need replacement, use a dental pick to dig out small bits of debris. File the pads lightly to remove any glazed surfaces they might have.
Step 2: Installation
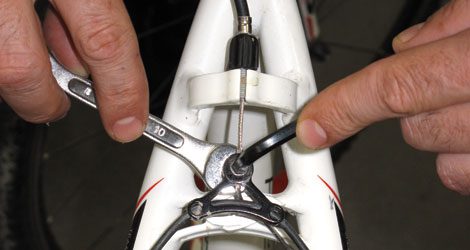
Make sure the wheels are true and centred in the frame and fork. Mount the brake arms onto the brake posts. If there’s a hole on the brake posts for the brake spring to enter, make sure the same hole is used for both right and left brake arms. Check cable friction by operating the brake lever with one hand and holding the bare cable with your other hand. If the cable feels gritty and rough, replace it. Much of the braking power is a result of the position of the straddle-cable holder. The lower the straddle-cable holder, or the closer it is to the tire, the greater the brakes’ stopping power. A general guideline for setting the straddle-cable holder is 30 mm above the tire, when the cable is pulled upward. However, if the cable is set too low, the brake-lever travel will be too great, and the stopping power will be diminished. Now that the arms are mounted and the straddle cable holder is set, feed the brake cable through the holder and secure the cable.
Step 3: Adjusting
The brake arms need to be centred with an equal distance from each side of the rim. Depending on the brand of brakes, this step is achieved either by turning a small set screw on the side of one brake arm or by adjusting external springs on the front of the brake arms.
To set a brake pad properly, you must make a series of small adjustments. Make sure the brake pad is centred on the braking surface of the rim. The front part of the pad must contact the rim before the rear. This setup is called “toe-in.” Ensure that as the pads travel through their arc, they do not come in contact with the tire sidewalls and do land against the upper edge of the rim.
With the pads loosely mounted in the brake arm and touching the rim squarely, begin to tighten the brake-pad hardware slightly. On some brakes, this process can be done with a 5-mm Allen key. On others, you’ll need both an Allen key and open-end wrench.
The final adjustment is setting the cable tension at the brake lever. Loosen the brake straddle cable and move it a few millimetres to determine if the amount of lever travel suits your needs. Spin the wheels to ensure they’re not rubbing against the brake pads. If one brake arm is moving more than the other, double-check the brake-spring tension and make the necessary adjustments to re-centre the setup.
Finally, double-check all the bolts for proper torque and go for a test ride.
You Will Need
Work stand
Metric Allen keys
Metric wrenches
New brake pads
Clean towels
Cleaning solvent
Emery cloth
Coarse file
Dental pick
Grease
Cantilever-Brake Parts
Brake arms
Right- and left-side brake springs
Straddle-cable holder
Straddle cable
Brake pads
Concave and convex adjusting washers (for some models of brakes)